

Uninstalling Responders
There are several ways to uninstall the AIR Responder from assets and these include using the AIR console or working on the actual asset.
It is important to understand that you should only remove the Responder if you have no intention of revisiting the asset for further investigations. If you do need to do so, then a fresh responder deployment will be needed.
From the Assets button in the Main Menu it is possible to select one or multiple assets and then, via the Bulk Action Bar, choose to either ‘Uninstall a Responder’ or to ‘Uninstall responder and purge console data’.
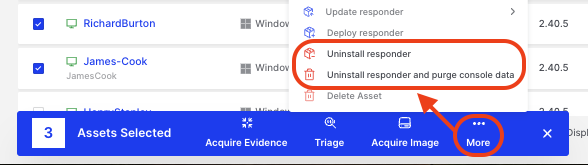
Uninstalling Responders: Bulk Action uninstall
It is also possible to uninstall a Responder from the individual asset’s, Asset Info page by selecting the option from the Asset Actions drop-down menu:
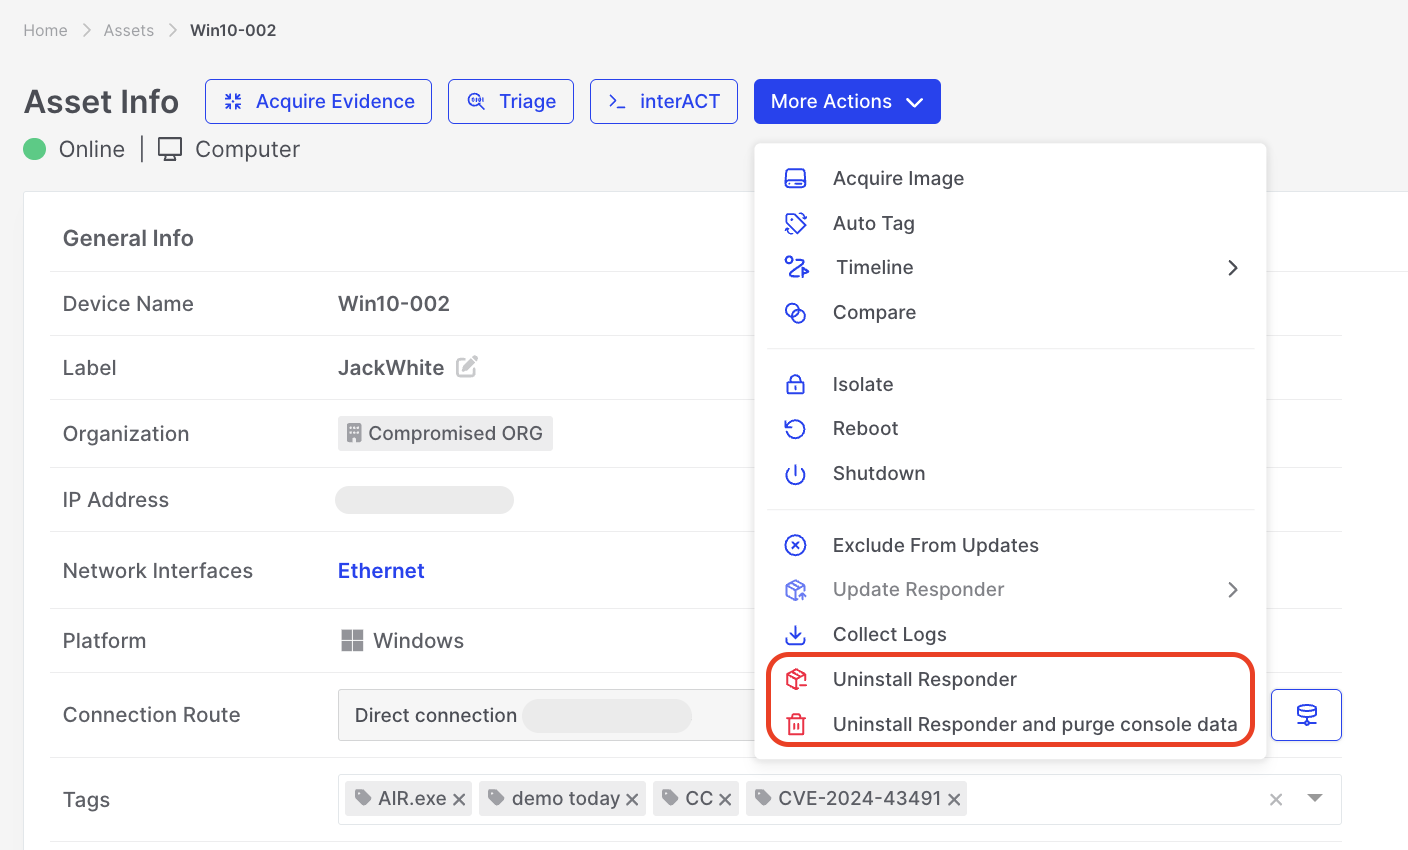
Uninstalling Responders: Individual asset uninstall
The ‘Uninstall Responder’ will remove the AIR Responder application from any selected assets.
The ‘Uninstall Responder and purge console data’ option will remove the AIR Responder application from the selected assets and delete the data saved from the assets on the console. All associated Tasks (eg, Timeline) will also be deleted from the console. Data saved to remote storage and locally saved data on the asset will remain intact. interACT or standard asset management tools can be used to remove this data.
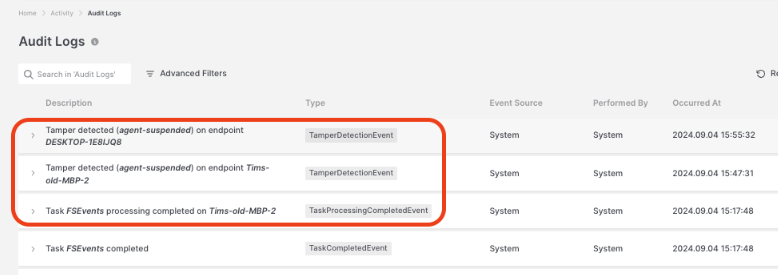
Uninstalling Responders: Tamper Detection Alerts amongst other 'normal' AIR activity in Audit Logs
Delete Asset option
Section titled “Delete Asset option”The Delete Asset button is available only for Disk Image asset types. For any other asset type, this option remains grayed out. When used, it simply removes the Disk Image of the asset from the console without affecting the asset itself.
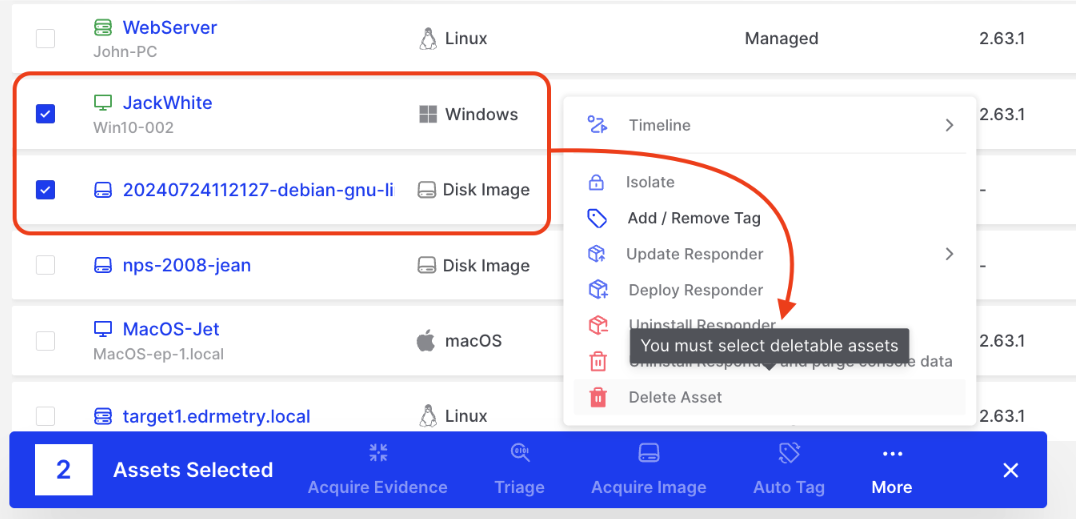
Uninstalling Responders: You must select deleable assets
As shown above, when attempting to delete assets in the system, certain restrictions apply based on the type of assets selected. For instance, if you select both a Windows asset and a Disk Image asset simultaneously, the “Delete Asset” option becomes unavailable (greyed out). This is because the Windows Asset is classified as non-deletable.
Key Details:
- Non-Deletable Assets: Windows assets are considered non-deletable within this system due to their critical nature or specific configuration settings that prevent deletion.
- Tooltip Information: When the “Delete Asset” option is greyed out, a tooltip will appear indicating that a non-deletable asset (the Windows Asset) has been selected, providing clarity on why deletion is restricted.
This design ensures that critical assets are protected from accidental deletion, enhancing the security and integrity of the system’s data management.
Managing uninstall codes
Section titled “Managing uninstall codes”Go to Settings > Assets > Uninstall Protection in the Console to manage manual uninstall codes.
- New Code: Generates a new Console-wide uninstall code. It can be used on any Responder managed by that Console for approximately 30 days. Previously generated codes remain valid until they expire.
- Revoke All Codes: Rotates the Console signing key, invalidating all previously generated uninstall codes and task authorizations, and automatically generates a new code. Responders that are offline apply the new key when they reconnect; until then, they continue to accept codes signed with the key they currently have.
Console-initiated uninstall tasks do not require a manual code. Each task carries a signed authorization valid for approximately seven days, allowing temporarily offline Responders to process the task after they reconnect.
Uninstalling on Windows assets
Section titled “Uninstalling on Windows assets”Graphical User Interface (GUI) Method
Section titled “Graphical User Interface (GUI) Method ”To gracefully uninstall the Responder application from your Windows operating system, follow these steps:
- Navigate to the Control Panel.
- Access the “Add/Remove Programs” feature.
- Locate and select the AIR Responder application from the list.
- Choose the option to uninstall.
Command Prompt Method
Section titled “Command Prompt Method ”You can also uninstall the Responder application using the command prompt with the following methods:
Using Product Code
To uninstall via the product code, execute the following steps:
- Identify the product code of the Responder using PowerShell:
get-wmiobject Win32_Product | Sort-Object -Property Name | Format-Table IdentifyingNumber, Name, LocalPackage -AutoSize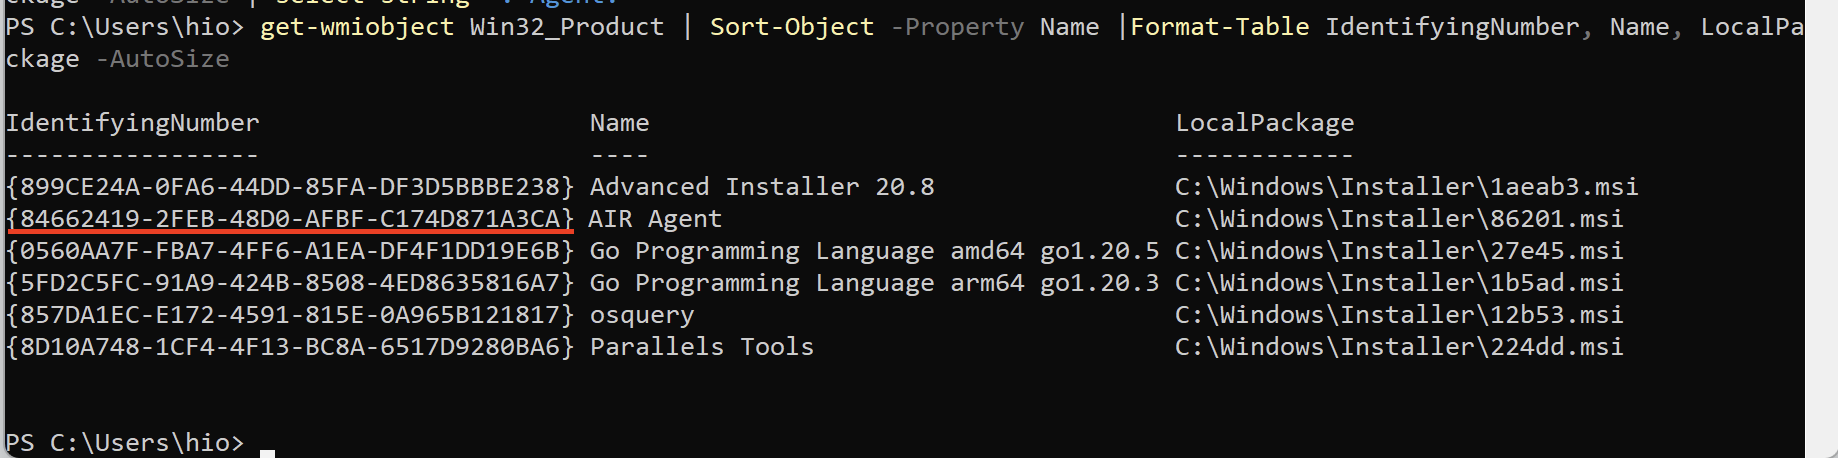
Identifying the product code of the Responder using Powershell
- Copy the identified product code.
- Uninstall the Responder using
msiexec:
msiexec /x "{84662419-2FEB-48D0-AFBF-C174D871A3CA}"Using the Original MSI File
If you possess the original MSI file of the Responder, you can proceed as follows:
msiexec /x "C:\Users\hio\Downloads\AIR.Agent_2.25.0_air-dev.binalyze.com_44_4ce0820f14f6461a_amd64_.msi"In either method, you can efficiently uninstall the Responder application from your system.
Uninstalling a Responder with Uninstall Protection Enabled
Section titled “Uninstalling a Responder with Uninstall Protection Enabled ”When Uninstall Protection is enabled, manual uninstallation requires a Console-generated uninstall code and must be performed from the command line.
- In the Console, go to Settings > Assets > Uninstall Protection.
- Select New Code, confirm the action, and copy the generated uninstall code.
- Run the following command, replacing
<uninstall-code>with the generated code:
msiexec /x "{84662419-2FEB-48D0-AFBF-C174D871A3CA}" UNINSTALL_CODE="<uninstall-code>"An uninstall code can be used on any Responder managed by the same Console and remains valid for approximately 30 days. Generating a new code does not invalidate previously generated codes.
Uninstalling without Purge
Section titled “Uninstalling without Purge ”To uninstall without removing leftover files, include the NO_PURGE=1 parameter in your command line:
msiexec /x "{84662419-2FEB-48D0-AFBF-C174D871A3CA}" NO_PURGE=1This ensures that the uninstallation process leaves the configuration and data files behind.
Uninstallation File and Directory Cleanup Process
Section titled “Uninstallation File and Directory Cleanup Process ”When uninstalling the AIR Responder program from a computer, certain files and directories are methodically cleaned up to ensure no residual data remains. All of these files are deleted by the Responder before the uninstallation process is finalized.
- Utils Directory: The utils binaries located in the Responder’s installation directory are removed. If the installation directory is
C:\Program Files (x86)\Binalyze\AIR\agent, folder can be found in:- C:\Program Files (x86)\Binalyze\AIR\agent\utils
- Upload Temporary Directory: The directory used for temporary storage of upload files is cleared. This can be found in one of the following paths.
- C:\Users\[user]\AppData\Local\Temp\BinalyzeUploadTemp
- C:\Windows\TEMP\BinalyzeUploadTemp
- Update Temporary Directory: The directory used for temporary storage of update files is cleared. This file can be found in one of the following paths.
- C:\Users\[user]\AppData\Local\Temp\BinalyzeUpdateTemp
- C:\Windows\TEMP\BinalyzeUpdateTemp
- Update Task Download Directory: The directory used for downloading MSI binaries, If the Windows system directory is
C:\, the path can be found as follows.- C:\BinalyzeUpdateTemp
- Binalyze Temp Directories: If the temp location is
C:\Windows\TEMP\, the paths can be found as follows.- C:\Windows\TEMP\Binalyze
- C:\Windows\TEMP\BinalyzeTemp
Uninstalling on Linux assets
Section titled “Uninstalling on Linux assets”On Ubuntu and Debian
Section titled “On Ubuntu and Debian ”- Open a terminal window.
- To uninstall the AIR Responder package, use the following command:
`sudo apt remove binalyze-air-agent`This command will uninstall the package.On CentOS, Fedora, Redhat and similar distributions (using dnf)
Section titled “On CentOS, Fedora, Redhat and similar distributions (using dnf) ”- Open a terminal window.
- To uninstall the AIR Responder package, run the following command:
`sudo dnf remove binalyze-air-agent`This command will uninstall the package.Uninstalling a Responder with Uninstall Protection Enabled
Section titled “Uninstalling a Responder with Uninstall Protection Enabled ”When Uninstall Protection is enabled, manual uninstallation requires a Console-generated uninstall code.
- In the Console, go to Settings > Assets > Uninstall Protection.
- Select New Code, confirm the action, and copy the generated uninstall code.
- Run the following command, replacing
<uninstall-code>with the generated code.
On Ubuntu and Debian:
sudo env AIR_UNINSTALL_CODE="<uninstall-code>" apt remove binalyze-air-agentOn CentOS, Fedora, Redhat and similar distributions:
sudo env AIR_UNINSTALL_CODE="<uninstall-code>" dnf remove binalyze-air-agentAn uninstall code can be used on any Responder managed by the same Console and remains valid for approximately 30 days. Generating a new code does not invalidate previously generated codes.
Uninstalling without Purge
Section titled “Uninstalling without Purge ”To uninstall without removing leftover files, you can set the AIR_NO_PURGE environment variable before initiating the uninstallation of the Responder. Execute the following command in your terminal to proceed with this method:
On Ubuntu and Debian:
AIR_NO_PURGE="1" sudo -E apt remove binalyze-air-agent
On CentOS, Fedora, Redhat and similar distributions:
AIR_NO_PURGE="1" sudo -E dnf remove binalyze-air-agent
This ensures that the uninstallation process will leave behind configuration and data files.
Uninstallation File and Directory Cleanup Process
Section titled “Uninstallation File and Directory Cleanup Process ”When uninstalling the AIR Responder program from a computer, certain files and directories are methodically cleaned up to ensure no residual data remains.
- Drone Config File: Drone config file located in the Responder’s installation directory. If the installation directory is
/opt/binalyze/air/agent, the file can be found in:- /opt/binalyze/air/agent/DRONE.Config.yml
- Utils Directory: The utils binaries located in the Responder’s installation directory are removed before the uninstallation of the service. If the installation directory is
/opt/binalyze/air/agent, the folder can be found in:- /opt/binalyze/air/agent/utils
- Upload Temporary Directory: The directory used for temporary storage of upload files is cleared. This folder can be found as follows.
- /var/lib/binalyze/BinalyzeUploadTemp
- Update Temporary Directory: The directory used for temporary storage of update files is cleared. This folder can be found as follows.
- /var/lib/binalyze/BinalyzeUpdateTemp
- Update Task Download Directory: The directory used for downloading deb or rpm binaries, If the Linux temp directory is
/tmp, the folder can be found as follows.- /tmp/BinalyzeUpdateTemp
- Binalyze Temp Directories: If the temp location is
/tmp, the folders can be found as follows.- /tmp/Binalyze
- /tmp/BinalyzeTemp
- Persistent Folder: The persistent folder can be found in:
- /var/lib/binalyze
- Config File: Config file is located in the Responder’s installation directory. After deleting the Responder, the configuration file is deleted. If the installation directory is
/opt/binalyze/air/agentthe file can be found in:/opt/binalyze/air/agent/config.yml
Uninstalling on macOS assets
Section titled “Uninstalling on macOS assets”To initiate the uninstallation process for the Responder via the Terminal on macOS, execute the following command:
sudo /opt/binalyze/air/agent/air --uninstall
This command, executed in the Terminal, will guide you seamlessly through the removal of the Responder application from your macOS system.
Uninstalling a Responder with Uninstall Protection Enabled
Section titled “Uninstalling a Responder with Uninstall Protection Enabled ”When Uninstall Protection is enabled, manual uninstallation requires a Console-generated uninstall code.
- In the Console, go to Settings > Assets > Uninstall Protection.
- Select New Code, confirm the action, and copy the generated uninstall code.
- Run the following command, replacing
<uninstall-code>with the generated code:
sudo env AIR_UNINSTALL_CODE="<uninstall-code>" /opt/binalyze/air/agent/air --uninstallAn uninstall code can be used on any Responder managed by the same Console and remains valid for approximately 30 days. Generating a new code does not invalidate previously generated codes.
Uninstalling without Purge
Section titled “Uninstalling without Purge ”To uninstall without removing leftover files, set the AIR_NO_PURGE environment variable before initiating the uninstallation of the Responder:
AIR_NO_PURGE="1" sudo -E /opt/binalyze/air/agent/air --uninstallThis ensures that the uninstallation process leaves the configuration and data files behind.
Uninstallation File and Directory Cleanup Process
When uninstalling the com.binalyze.air-agent program from a computer, specific files and directories are methodically cleaned up to ensure no residual data remains. All of these files are deleted by the Responder after the package info is deleted.
- Utils Directory: The utils binaries located in the Responder’s installation directory are removed before the uninstallation of the service. If the installation directory is
/opt/binalyze/air/agent, the folder can be found in:- /opt/binalyze/air/agent/utils
- Binaries: If the installation directory is
/opt/binalyze/air/agent, these files are located in:- /opt/binalyze/air/agent/air
- /opt/binalyze/air/agent/tactical
- /opt/binalyze/air/agent/drone
- Config File: This file is located in the Responder’s installation directory. If the installation directory is
/opt/binalyze/air/agent, file can be found in:- /opt/binalyze/air/agent/config.yml
- Drone Config File: This file is located in the Responder’s installation directory. If the installation directory is
/opt/binalyze/air/agent, the file can be found in:- /opt/binalyze/air/agent/DRONE.Config.yml
- Service File: This file can be found in:
- /Library/LaunchDaemons/com.binalyze.air-agent.plist
- Upload Temporary Directory: The directory used for temporary storage of upload files are cleared. This folder can be found as follows.
- /var/lib/binalyze/BinalyzeUploadTemp
- Update Temporary Directory: The directory used for the temporary storage of update files is cleared. This folder can be found as follows.
- /var/lib/binalyze/BinalyzeUpdateTemp
- Update Task Download Directory: The directory used for downloading pkg binaries, if the unix temp directory is
/tmp, the folder can be found as follows.- /tmp/BinalyzeUpdateTemp
- Binalyze Temp Directories: If the temp location is
/tmp, the folders can be found as follows.- /tmp/Binalyze
- /tmp/BinalyzeTemp
- Persistent Folder: The persistent folder can be found in:
- /var/lib/binalyze