RelayPro
Overview
Section titled “Overview”The RelayPro relay server is a specialized, authenticated proxy server designed to provide secure connections between AIR Responders and the AIR console. It acts as an intermediary relay that validates every Responder connection and securely forwards traffic to the AIR console. RelayPro is purpose-built for AIR and is not intended for general proxy use cases.
Unlike the deprecated Relay Server, RelayPro does not require a Responder to be installed on the same machine. This separation reduces the overall attack surface and aligns with modern zero-trust and least-privilege design principles.
How it Works
Section titled “How it Works”All Responder connections use HTTPS for secure communication and must complete a two-step authentication flow:
- Initial authentication — the Responder authenticates with RelayPro using JWT credentials.
- Secure forwarding — RelayPro validates the token and forwards authorized requests to the AIR console only when the target address and port are allowed.
This flow ensures only authorized Responders can establish connections to the AIR console.
Security Features
Section titled “Security Features”- Unique authentication — each Responder receives its own time-limited JWT tokens
- Enhanced encryption — token encryption keys are derived uniquely per Responder
- Zero persistence — encryption keys are not shared between Responders or stored permanently
- Resilient design — if RelayPro restarts, existing valid tokens remain functional
- Modern JSON logging — logs are stored locally on the RelayPro server (not retrievable remotely)
Network Ports
Section titled “Network Ports”RelayPro uses the same network ports as Responders connecting directly to the AIR console:
- 443 (HTTPS) — required
- 80 (HTTP) — optional, used only for HTTP reachability tests when HTTPS is unavailable
- 4222 (NATS) — optional, used when NATS is enabled in the AIR console
Key Differences from the Legacy Relay Server
Section titled “Key Differences from the Legacy Relay Server”- Independent deployment — no Responder required on the RelayPro host
- Enhanced security — HTTPS + JWT authentication instead of SOCKS5 without authentication
- Manual management — installation/upgrade/uninstallation are attended by admins
- Logging changes — local-only JSON logs; remote log fetch is not supported
- Configuration flexibility — more adjustable configuration options
Download and Install
Section titled “Download and Install”Download the Package
Section titled “Download the Package”- In the AIR console, go to Organization Settings → Relay Server.
- Select New Relay.
- Choose New RelayPro.
- Download the package for your platform/architecture.
RelayPro is available as .deb and .rpm packages.
RelayPro: Create a new RelayPro from Organization Settings
RelayPro: Download the RelayPro package and review prerequisites
Prerequisites
Section titled “Prerequisites”- Linux only (currently supported)
- Architecture: amd64 (x86_64) or arm64 (aarch64)
- Linux Kernel: 3.9 or later
- systemd: 231 or later
- Responder version: 2.79 or later
Standard, up-to-date Linux distributions typically meet these requirements.
Installation Commands
Section titled “Installation Commands”RelayPro uses environment variables during installation to register with the AIR console. Always set them first and use sudo -E to preserve the environment.
export AIR_CONSOLE_ADDRESS=your-console-addressexport AIR_ORGANIZATION_ID=your-organization-idexport AIR_DEPLOYMENT_TOKEN=your-deployment-tokenFor .deb packages:
sudo -E dpkg -i ./binalyze-air-relaypro_<VERSION>_<ARCH>.debFor .rpm packages:
sudo -E dnf install -y ./binalyze-air-relaypro_<VERSION>_<ARCH>.rpmExample:
export AIR_CONSOLE_ADDRESS=192.168.1.100export AIR_ORGANIZATION_ID=0export AIR_DEPLOYMENT_TOKEN=1234567890abcdef
sudo -E dpkg -i ./binalyze-air-relaypro_1.0.0_amd64.deb
RelayPro: Example RelayPro installation on Linux
Package Details
Section titled “Package Details”- Package name:
binalyze-air-relaypro - Service name:
binalyze-air-relaypro.service(systemd) - Installation directory:
/opt/binalyze/air/relaypro
The installation directory includes the RelayPro binary, logs, and a configuration file. Logging is enabled by default and is fully configurable.
Registration and Status
Section titled “Registration and Status”After installation and service start, RelayPro registers with the AIR console. On success, it updates /opt/binalyze/air/relaypro/config.yml with:
relayIdregisteredTosecurityToken
You can verify status in:
- Config file:
/opt/binalyze/air/relaypro/config.yml - AIR console: Organization Settings → Relay Server

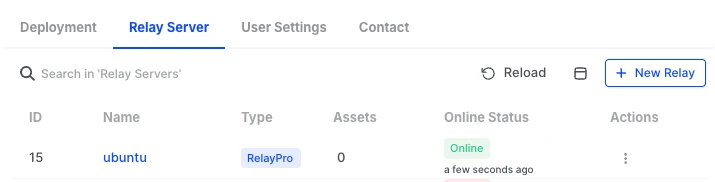
RelayPro: RelayPro registered and visible in the Relay Server list
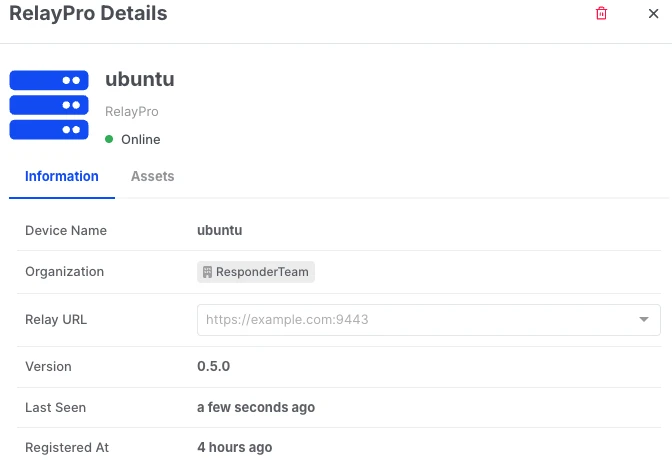
Relay URL (Mandatory)
Section titled “Relay URL (Mandatory)”- Go to Organization Settings → Relay Server.
- Click the RelayPro Name to open its details.
- Enter the Relay URL and save.
The Relay URL must include the port, for example:
https://relaypro.example.com:9443If you use an intermediate proxy or load balancer, set the Relay URL to the first hop your Responders connect to:
https://intermediate-proxy.example.com:443The Relay URL is the advertised URL of RelayPro and is what Responders will use to connect.
Assign Responders and Connection Route
Section titled “Assign Responders and Connection Route”When a RelayPro is registered and its Relay URL is set, it becomes available in Connection Route settings.
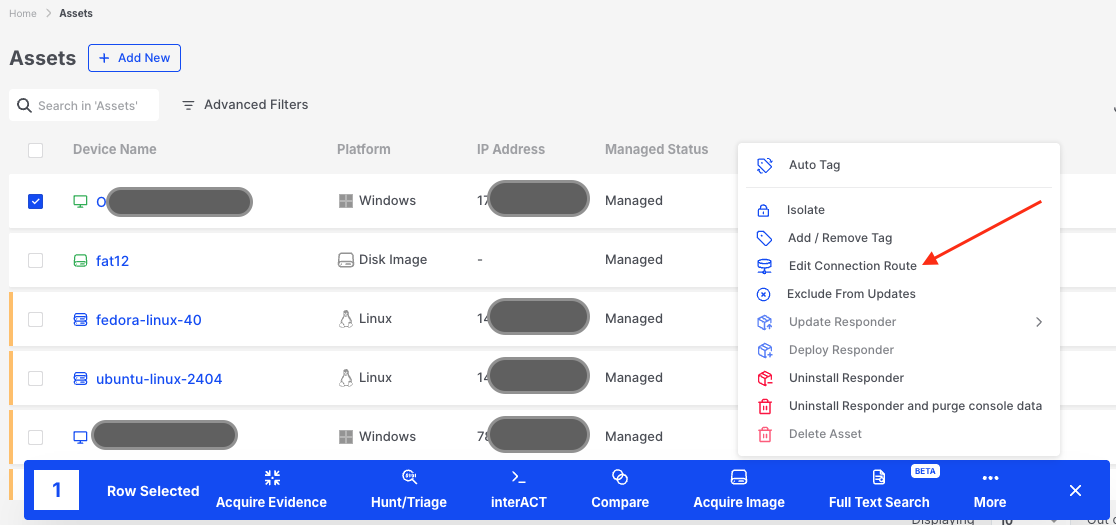
RelayPro: Edit Connection Route from the Assets list
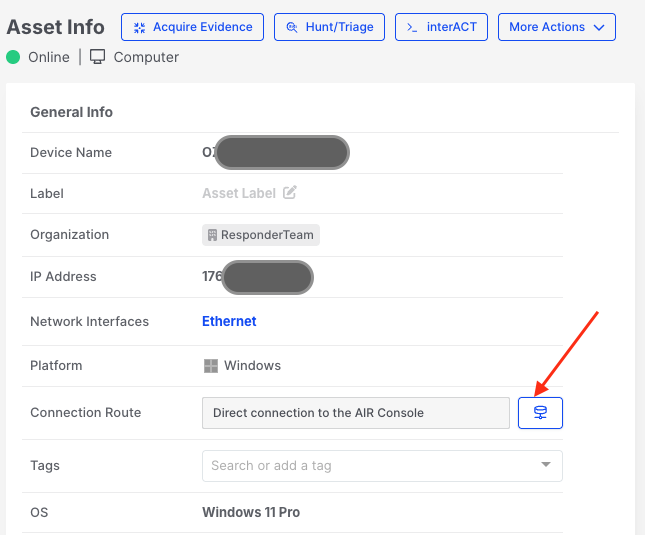
RelayPro: Open the Connection Route selector from the Asset Info page
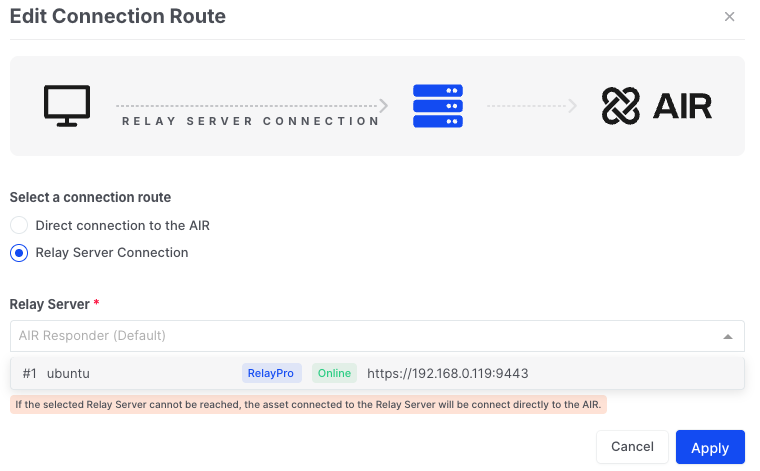
RelayPro: Select RelayPro as the connection route
If a Responder is switched to Direct Connection to the AIR console after previously using RelayPro:
- The Responder will attempt direct connection first.
- If direct connection fails, it will continue to use RelayPro while periodically re-checking direct availability.
- Once direct connection succeeds, the Responder stops using RelayPro.
Service Management
Section titled “Service Management”RelayPro runs as a systemd service and operates as a non-root user air-relaypro. The user and group are created automatically during installation.
sudo systemctl stop binalyze-air-relayprosudo systemctl start binalyze-air-relayprosudo systemctl restart binalyze-air-relayprosudo systemctl status binalyze-air-relayprosudo systemctl reload binalyze-air-relayproIf you uninstall RelayPro, remove the air-relaypro user and group manually afterward.
Configuration
Section titled “Configuration”RelayPro configuration is stored in:
/opt/binalyze/air/relaypro/config.ymlNormally, you should not edit this file manually. Common reasons to update it include:
- Changing HTTPS proxy listener address/port
- Adjusting log file locations or rotation settings
- Changing CA certificate file or private file locations
- Manually configuring console addresses for migration
Core Configuration Fields
Section titled “Core Configuration Fields”| Field | Type | Required | Description |
|---|---|---|---|
consoleAddress | string | Yes | Address of the AIR console |
registeredTo | string | Yes | Console address this RelayPro is registered to |
organizationId | integer | Yes | Organization ID provided during installation |
Optional or Temporary Configuration Fields
Section titled “Optional or Temporary Configuration Fields”| Field | Type | Required | Description |
|---|---|---|---|
relayProId | string | Yes | Unique RelayPro instance ID (generated if missing) |
relayId | integer | Yes | Relay ID provided by the AIR console during registration |
securityToken | string | Yes | Token used to authenticate RelayPro requests |
consoleCACert | string | Yes | CA certificate in x509 PEM format |
proxyEnabled | bool | Yes | Use system proxy to connect and forward traffic |
debugLogging | bool | Yes | Enable debug logging |
deploymentToken | string | No | Token used during registration (cleared after) |
serverName | string | No | Server name for auto-generated TLS certificates |
privateFolder | string | No | Path to private data folder |
passwordFile | string | No | Password file for testing-only authentication |
clientAuthToken | object | No | JWT token duration settings |
httpsProxy | object | No | HTTPS proxy listener configuration |
migration | object | No | Console migration information |
logger | object | No | Logger configuration |
Example Configuration
Section titled “Example Configuration”## Core connection settingsconsoleAddress: "console.binalyze.com"registeredTo: "console.binalyze.com"organizationId: 1relayProId: "e915b65b-ad83-4e81-991b-f236c1f90ad2"relayId: 3securityToken: "6a635b1d-398e-4a38-a908-4c53d75a641a"consoleCACert: "-----BEGIN CERTIFICATE-----..."
## Optional proxy and debug logging settings# proxyEnabled: true# debugLogging: false
## Optional settings# privateFolder: "/var/lib/relaypro/private"# passwordFile: "/var/lib/relaypro/private/password.txt"
## Optional HTTPS proxy configuration# httpsProxy:# listen: "0.0.0.0:8080"
## Optional migration settings# migration:# consoleAddress: "new-console.binalyze.com"# validUntilAt: "2026-12-31T23:59:59Z"
## Optional logger configuration# logger:# fileName: "relaypro.log.txt"# maxSize: "5GiB"# maxAge: "1week"# maxBackups: 10# noCompress: falseLogger Configuration (Environment Variable)
Section titled “Logger Configuration (Environment Variable)”RelayPro merges logger configuration from the config file and the environment variable. The environment variable has higher priority.
RELAYPRO_LOGGER_CONF=fileName=relaypro.log.txt,maxSize=5GiB,maxAge=1week,maxBackups=10,noCompress=falseReload vs Restart
Section titled “Reload vs Restart”Changes requiring service restart:
privateFolderserverNamehttpsProxylogger
Changes applied on reload:
consoleAddressregisteredTorelayProIdsecurityTokenrelayIddebugLoggingproxyEnabledconsoleCACertclientAuthTokenmigration
HTTPS Proxy Listener
Section titled “HTTPS Proxy Listener”RelayPro includes a built-in HTTPS proxy server. It is enabled by default and listens on 0.0.0.0:9443.
Example configuration:
httpsProxy: listen: "0.0.0.0:8443"Set the Relay URL in the AIR console to match the advertised address and port:
https://relaypro.example.com:9443If you use an intermediate proxy or load balancer, set the Relay URL to that external endpoint:
https://intermediate-proxy.example.com:443HTTPS and HTTP Listener Environment Variables
Section titled “HTTPS and HTTP Listener Environment Variables”RELAYPRO_HTTPS_LISTEN— configure the HTTPS listenerRELAYPRO_HTTP_LISTEN— enable an HTTP listener (disabled by default)
Password File (Testing Only)
Section titled “Password File (Testing Only)”Password-based authentication is intended for testing. After testing, remove the password file from config/env and reload.
Example password file:
username1:password1username2:password2Example test request:
https_proxy=https://127.0.0.1:9443 \curl --proxy-user username1:password1 \ --proxy-insecure -k https://your-air-console.binalyze.com/api/app/checkYou can set a password file via RELAYPRO_PASSWORD_FILE without editing the config file.
CA Bundle File
Section titled “CA Bundle File”RelayPro generates a CA bundle at startup if one does not exist. This bundle is used to:
- Generate TLS certificates for clients
- Derive encryption keys for JWT token protection
If the CA bundle changes, Responders will re-authenticate and update their certificates, which invalidates existing JWT token encryption. Back up the CA bundle and keep it safe.
Multiple RelayPro instances can share the same CA bundle for clustering scenarios.
You can specify the CA bundle path via:
RELAYPRO_CA_BUNDLE_FILERelayPro supports PEM-encoded certificates with RSA private keys (PKCS#1 only).
Environment Variables
Section titled “Environment Variables”Recommended location for environment variables:
/etc/environment.d/binalyze-air-relaypro.confRelayPro supports standard proxy variables for RelayPro → AIR console connections:
HTTPS_PROXYHTTP_PROXYNO_PROXY
Lowercase variants are also supported. RelayPro uses the CONNECT method when communicating via a proxy.
Upgrade
Section titled “Upgrade”RelayPro has an independent release cycle (separate from Responder versioning). Upgrade only when notified by AIR release notes.
To upgrade:
- Download the latest RelayPro package for your platform.
- Install it using the same package manager.
During an upgrade:
- A temporary RelayPro process starts
- The old process drains existing connections
- The new process takes over
- The temporary process stops after connections close
If anything goes wrong during the update, interrupt it and restart the update process. If the issue persists, stop the RelayPro service and retry the update.
Check status and logs during the upgrade:
sudo systemctl status binalyze-air-relayproEnable debug logging during upgrade and disable it afterward. No system reboot is required.
Uninstall
Section titled “Uninstall”Before uninstalling, remove the RelayPro from the AIR console:
Organization Settings → Relay Server → Remove RelayPro
Then uninstall:
# For deb packagessudo apt-get remove binalyze-air-relaypro
# For rpm packagessudo dnf erase binalyze-air-relaypro
Cleanup remaining files and users:
sudo rm -rf /opt/binalyze/air/relayprosudo rm -rf /etc/environment.d/binalyze-air-relaypro.confsudo userdel -r air-relayprosudo groupdel air-relayproMigration from Legacy Relay Server
Section titled “Migration from Legacy Relay Server”When migrating, plan a staged rollout:
- Identify target Responders.
- Verify compatibility — Responders should run v2.74.1 or later for RelayPro compatibility.
- Install RelayPro.
- Configure RelayPro.
- In the AIR console, go to Organization Settings → Relay Server, and set the Relay URL.
- Assign one or more Responders to RelayPro.
- Verify connectivity (may take several minutes).
- Optional: install a new Responder via New Asset → Choose a Connection Route to validate.
- Migrate remaining Responders.
- Keep the legacy Relay Server available for rollback if needed.
- If issues occur, contact Support and revert if required.
RelayPro is a distinct product and can be installed on the same machine as the legacy Relay Server.