Git Repositories
AIR allows you to connect your organization’s Git repositories directly to the platform to manage Hunt/Triage rules as a single source of truth. By importing YARA, Sigma, and osquery rule files from a Git repository, your team can maintain version-controlled, auditable rulesets that stay synchronized with your detection engineering workflow.
Below is a short introductory demo of the Git Repositories integration.
Supported Providers
Section titled “Supported Providers”| Provider | Repository URL Format |
|---|---|
| GitHub | https://github.com/<owner>/<repo> |
| GitLab (cloud and self-hosted) | https://gitlab.com/<owner>/<repo> |
| Azure DevOps | https://dev.azure.com/<org>/<project>/_git/<repo> |
| Bitbucket | https://bitbucket.org/<owner>/<repo> |
Organization Scope
Section titled “Organization Scope”Repository connections are created per organization. If you manage multiple organizations in AIR, you must switch to each organization individually before adding a repository connection.
Adding a Repository Connection
Section titled “Adding a Repository Connection”Navigate to Integrations > Git Repositories and click Add New to open the repository connection wizard.
Step 1: Repository Details
Section titled “Step 1: Repository Details”Configure the connection to your Git provider:
- Name — A descriptive name to identify this repository connection (e.g., “YARA Rules - Windows” or “Sigma Detection Rules”)
- Organization — The organization that will own this connection (must match the organization you are working in; switch organizations first if needed)
- Provider — Select your Git provider (GitHub, GitLab, Azure DevOps, or Bitbucket)
- Repository URL — The full URL of your Git repository. The URL must match the selected provider
- Branch — The branch to synchronize from (e.g.,
mainormaster). This field is required even if the placeholder text suggests a default - Access Token — A personal access token with read permissions to the repository
- Webhook — For automatic, webhook-based synchronization, the console shows where to point the webhook after the connection is created. Until then, the wizard may display a placeholder such as Will be generated after creation.
Click Test Connection to verify that AIR can authenticate and access the repository before proceeding.
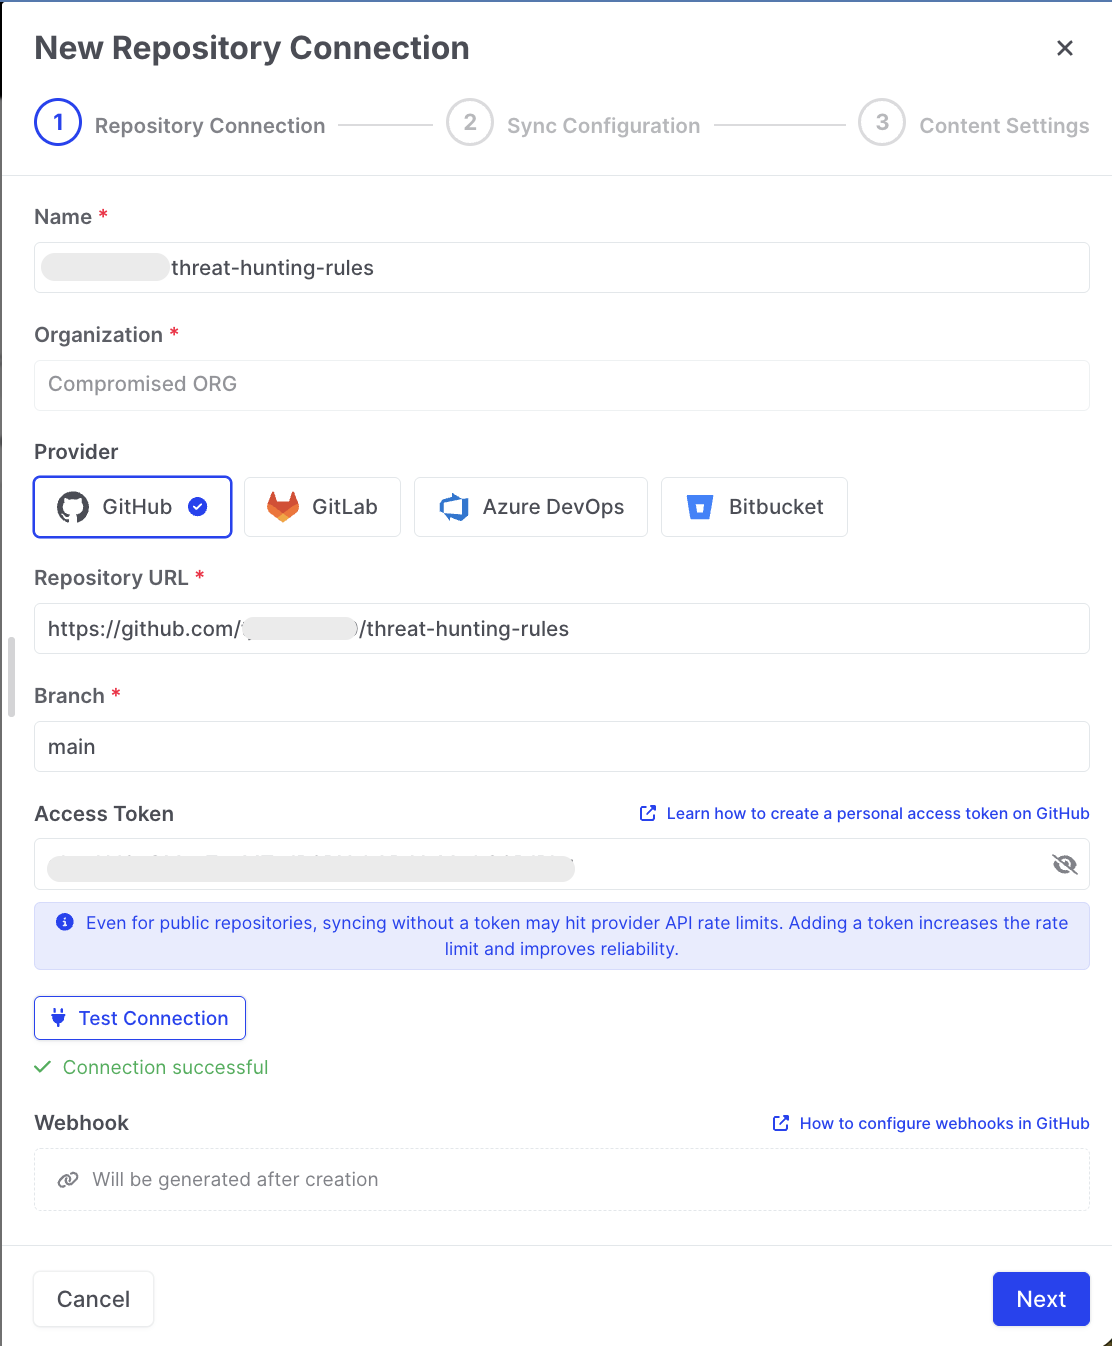
Git Repositories: Repository Connection
Step 2: Sync Configuration
Section titled “Step 2: Sync Configuration”Define which files to synchronize and how often:
- Include Paths — Browse the repository contents and select specific directories or files to import. You can select individual subdirectories to scope the import to relevant rule files only
- Exclude Paths — Specify directories to skip during synchronization (e.g., documentation or test folders)
- File Patterns — Define file extension filters to refine which files are imported (e.g.,
*.yar,*.yara,*.yml) - Sync Interval — Choose how frequently AIR checks the repository for changes:
- Manual — Sync only when triggered manually
- Automatic — Sync on every detected commit or push (webhook-based)
- Scheduled — Sync at a fixed interval (15 minutes, 30 minutes, 1 hour, or 2 hours)
The wizard also summarizes sync limits: individual files over 10 MB and repositories over 10,000 files are skipped automatically (see Limits).
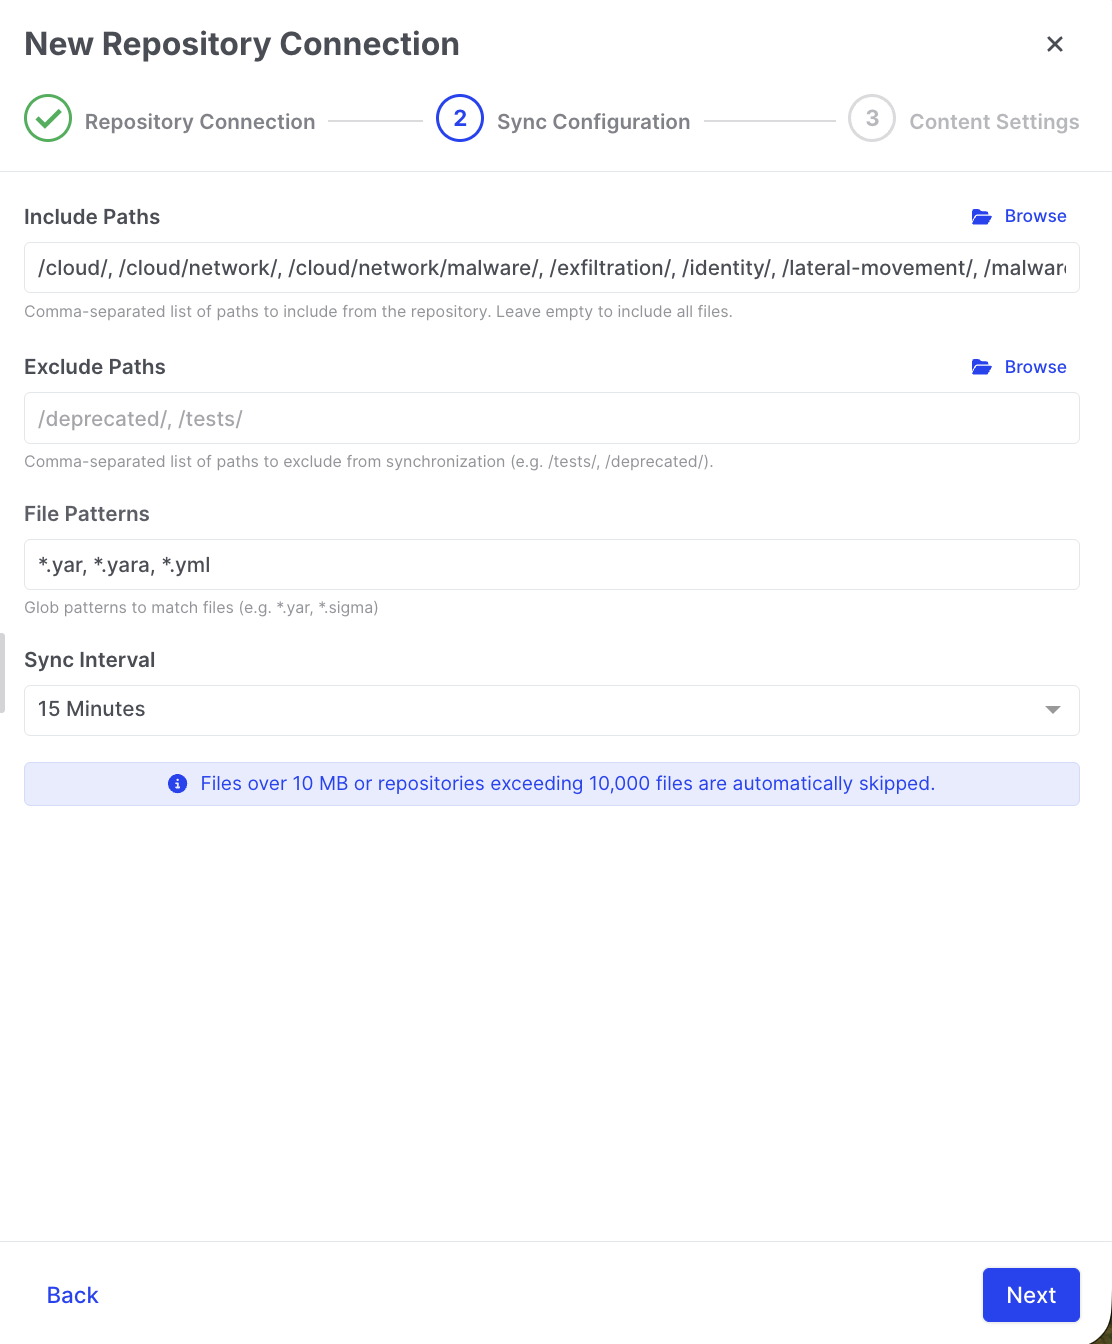
Git Repositories: Sync Configuration
Step 3: Content Settings
Section titled “Step 3: Content Settings”This step is labeled Content Settings in the wizard. Configure how imported rules are managed within AIR:
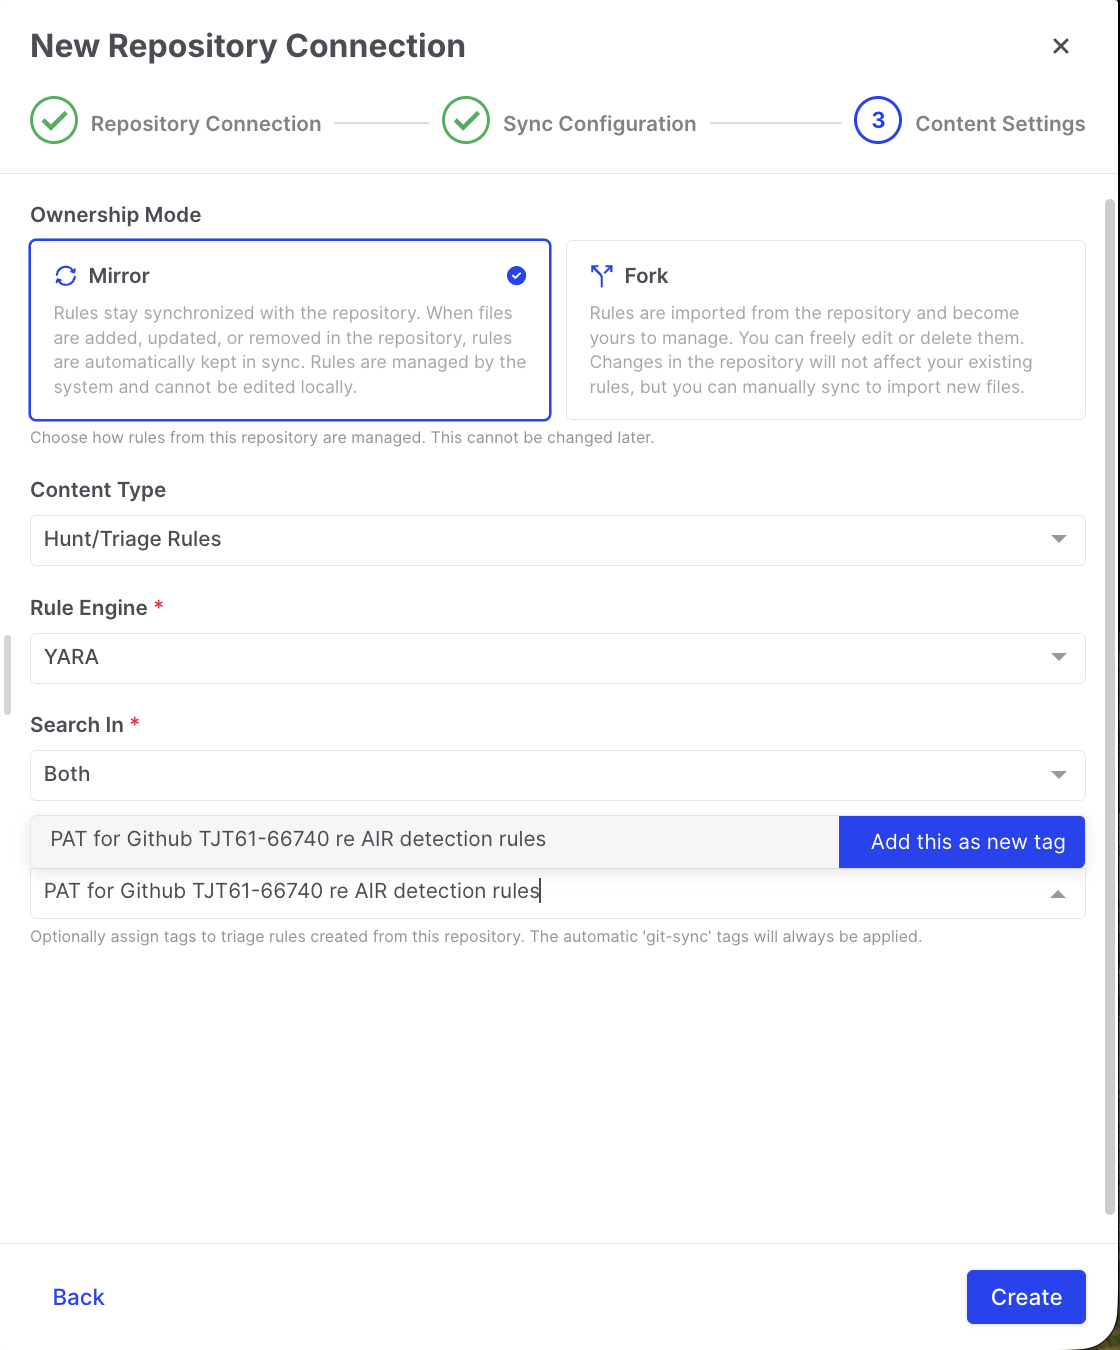
Git Repositories: Content Settings
Ownership Mode
Section titled “Ownership Mode”This is the most important configuration choice. Two modes are available:
| Mode | Behavior |
|---|---|
| Mirror | Rules stay synchronized with the repository. When files are added, updated, or removed in the repository, rules are automatically kept in sync. Rules are managed by the repository and cannot be edited locally in AIR. |
| Fork | Rules are imported from the repository and become yours to manage. You can freely edit or delete them within AIR, but changes in the repository will not affect existing rules. You can manually trigger a sync to import new files. |
Content Type
Section titled “Content Type”Currently, the only supported option in the Content Type dropdown is Hunt/Triage Rules. Additional content types may be added in future releases.
Rule Engine
Section titled “Rule Engine”Select the rule engine that matches the files in your repository:
- YARA — For YARA rule files. When YARA is selected, you must also choose Search In (scan Memory, Disk, or Both). The console labels this control Search In; it defines the same hunt scope as Memory / Disk / Both described elsewhere in AIR.
- Sigma — For Sigma detection rule files
- osquery — For osquery pack files
Add tags to organize and filter the imported rules within AIR. Tags are applied to all rules imported from this connection and appear in the Libraries > Hunt/Triage Rules view. Automatic git-sync tags are always applied in addition to any tags you add. You can use nested tagging with colons (e.g., APT28:Windows:persistence) for hierarchical organization.
Click Create to finalize the connection.
Synchronization
Section titled “Synchronization”After creating a repository connection, AIR performs the initial synchronization based on your configuration. You can monitor and manage synchronization from the Integrations > Git Repositories page.
Sync Status
Section titled “Sync Status”The repository list displays key information for each connection:
- Repository Name and Provider
- Repository URL
- Sync Status — Success, In Progress, or Failed
- Last Sync timestamp
- Created By
Sync Logs
Section titled “Sync Logs”Click on a repository connection to view detailed synchronization logs. Each sync event records:
- Files added, updated, or removed
- Any errors or skipped files
- Timestamp and duration
Manual Sync
Section titled “Manual Sync”Click Sync Now on any repository connection to trigger an immediate synchronization, regardless of the configured sync interval.
Viewing Synced Rules
Section titled “Viewing Synced Rules”Imported rules appear in Libraries > Hunt/Triage Rules alongside manually created rules. Rules imported from a Git repository are identified by a Git Repository source label, making it easy to distinguish them from locally created rules.
From the rule details view, you can see all metadata including the tags, rule engine, ownership mode, and source repository associated with each rule.
Webhooks for Automatic Sync
Section titled “Webhooks for Automatic Sync”When using the Automatic sync interval, AIR uses webhooks to receive push notifications from your Git provider. This ensures rules are updated immediately when changes are committed to the repository. Refer to your Git provider’s documentation for webhook configuration:
- GitHub — Configure a webhook in your repository’s Settings > Webhooks section
- GitLab — Configure a webhook in your project’s Settings > Webhooks section
- Azure DevOps — Configure a service hook in Project Settings > Service hooks
- Bitbucket — Configure a webhook in your repository’s Settings > Webhooks section
Links to the relevant provider documentation are provided within the AIR connection wizard during setup.
Limits
Section titled “Limits”AIR enforces file size and repository limits to maintain performance:
- Individual rule files larger than 10 MB are skipped during synchronization
- Repositories containing more than 10,000 files are skipped; an informational notice is shown in the wizard and sync experience
These limits are designed to prevent performance degradation and are displayed in the AIR interface when applicable.
Network Requirements
Section titled “Network Requirements”The AIR Console connects directly to your Git provider to fetch repository contents. If your organization restricts outbound network access from the Console, ensure the following domains are allowed:
| Provider | Domain(s) to Allow |
|---|---|
| GitHub | github.com, api.github.com |
| GitLab (cloud) | gitlab.com |
| GitLab (self-hosted) | Your GitLab instance domain |
| Azure DevOps | dev.azure.com |
| Bitbucket | bitbucket.org, api.bitbucket.org |